Thủ thuật với Mediawiki/Công thức Toán cho Mediawiki trên Windows
Cách làm dưới đây được tôi áp dụng thành công cho Mediawiki 167 và 182 trên máy Windows XP.
Mục lục
Đối với Mediawiki 167[sửa]
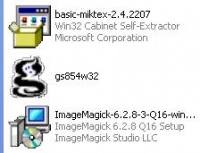
Bước 1. Dowload 3 gói sau và cài đặt mặc định (của tôi là ổ C:)
- Cài gói basic-miktex-2.5
- Giải nén và cài gói gs854w32
-
Cài
gói
ImageMagick-6.3-Q16-windows-dll
-
- download tại: http://www.imagemagick.org/script/binary-releases.php#windows
-
Bạn
nên
kiểm
tra
xem
ImageMagick
đã
hoạt
động
chưa
bằng
cách
vào
start
=>
Run
=>
cmd
rồi gõ hai lệnhconvert logo: logo.miffvàimdisplay logo.miff.
-
Bước
2.
Tới
thư
mục
your_wiki\images
và
tạo
hai
thư
mục
mới:
math
và
tmp.
Bước
3.
Bổ
sung
đoạn
code
dưới
đây
vào
file
your_wiki\LocalSettings.php:
#Where is your ImageMagick
$wgUseImageMagick = true;
$wgImageMagickConvertCommand    = "convert.exe";
$wgImageMagickIdentifyCommand   = "identify.exe";

## you can enable inline LaTeX equations:
$wgUploadPath       = "{$wgScriptPath}/images"; //ap dung voi 1.11.0
$wgUploadDirectory  = "{$IP}/images";           //ap dung voi 1.11.0
$wgUseTeX           = true;
$wgMathPath         = "{$wgUploadPath}/math";
$wgMathDirectory    = "{$wgUploadDirectory}/math";
$wgTmpDirectory     = "{$wgUploadDirectory}/tmp";

#Where is your Tex
$wgLaTexCommand         = "latex.exe";
$wgDvipsCommand         = "dvips.exe";
Bước
4.
Thay
file
your_wiki\includes\Math.php
bằng
file:
Bước 5. Làm sạch bộ nhớ đệm và chạy thử!!!
Đối với Mediawiki 1.6.10[sửa]
Cấu hình:
MediaWiki: 1.6.10
PHP: 5.2.3 (apache2handler)
MySQL: 5.0.41-community-nt
Bước 1, 2, 3, 4. làm giống như với Mediawiki 167.
Bước
5.
Mở
file
your_wiki\includes\Parser.php
5.1. Tìm đến đoạn:
<?php
/**
 * File for Parser and related classes
 *
 * @package MediaWiki
 * @subpackage Parser
 */
- sửa thành:
<?php
/**
 * File for Parser and related classes
 *
 * @package MediaWiki
 * @subpackage Parser
 */
/** */ //Bổ sung thêm 4 dòng này:
require_once( 'Sanitizer.php' );
require_once( 'HttpFunctions.php' );
require_once( 'ImageGallery.php' );
require_once( 'Math.php');
5.2. Tìm đến đoạn:
case 'math':
        $output = renderMath( $content );
        break;
- và sửa thành:
case 'math':
        $output = MathRenderer::renderMath( $content );
        break;
5.3. Save and Close file.
Bước 6. Làm sạch bộ nhớ và chạy thử!
Đối với Mediawiki 182[sửa]
Cách 1. Dùng dvips.exe[sửa]
Bước 1, 2, 3, 4. làm giống như với Mediawiki 167.
Bước
5.
Mở
file
your_wiki\includes\Parser.php
5.1. Tìm đến đoạn:
<?php
/**
 * File for Parser and related classes
 *
 * @package MediaWiki
 * @subpackage Parser
 */
- sửa thành:
<?php
/**
 * File for Parser and related classes
 *
 * @package MediaWiki
 * @subpackage Parser
 */
/** */ //Bổ sung thêm 4 dòng này:
require_once( 'Sanitizer.php' );
require_once( 'HttpFunctions.php' );
require_once( 'ImageGallery.php' );
require_once( 'Math.php');
5.2. Tìm đến đoạn:
case 'math':
        $output = MathRenderer::renderMath( $content );
        break;
- và sửa thành:
case 'math':
        $output = renderMath( $content ); //MathRenderer::renderMath( $content );
        break;
5.3. Save and Close file.
Bước 6. Làm sạch bộ nhớ và chạy thử!
Cách 2. Dùng dvipng.exe[sửa]
Theo cách này, hình ảnh hiển thị không được "nét" bằng cách cách 1 và còn một số hạn chế khác... Hiện tại tôi xài cách 1 cho Mediawiki 182.
Bước 1, 2. làm giống như với Mediawiki 167.
Bước
3.
Config
file
your_wiki\LocalSettings.php
như
sau:
#Where is your ImageMagick
$wgUseImageMagick = true;
$wgImageMagickConvertCommand    = "convert.exe";
$wgImageMagickIdentifyCommand   = "identify.exe";

## you can enable inline LaTeX equations:
$wgUseTeX                = true;
$wgMathPath         = "{$wgUploadPath}/math";
$wgMathDirectory    = "{$wgUploadDirectory}/math";
$wgTmpDirectory     = "{$wgUploadDirectory}/tmp";

#Where is your Tex
$wgLaTexCommand         = "latex.exe";
$wgDvipsCommand         = "dvipng.exe";         //<---- ở trên là "dvips.exe"
Bước
4.
Thay
file
\diskw\www\your_wiki\includes\Math.php
bằng
file:
Bước 5. Làm sạch bộ nhớ và chạy thử!


